

{
“@type”: “Article”,
“author”: {
“url”: “https://htexs.com”,
“name”: “Htexs”,
“@type”: “Organization”
},
“@context”: “https://schema.org”,
“headline”: “Solar Panel Installation Guide: Step-by-Step Setup for Homes”,
“publisher”: {
“url”: “https://htexs.com”,
“name”: “Htexs”,
“@type”: “Organization”
},
“inLanguage”: “en”,
“articleBody”: “Discover a complete solar panel installation guide with step-by-step instructions for efficient home systems. Achieve reliable, verified solar power results.”,
“description”: “Discover a complete solar panel installation guide with step-by-step instructions for efficient home systems. Achieve reliable, verified solar power results.”,
“datePublished”: “2025-10-26T01:38:02.234Z”
}
Over one million US homes added solar panels in 2023, showing a huge jump in demand for clean energy. More people are discovering that setting up a home solar system can cut long-term energy costs and boost property value. Knowing how to approach each step, from site assessment to final safety checks, can make all the difference when starting your solar journey.

Table of Contents
- Step 1: Assess Site And Gather Required Tools
- Step 2: Select And Prepare Mounting Location
- Step 3: Install Mounting System Securely
- Step 4: Attach Solar Panels And Make Electrical Connections
- Step 5: Verify System Safety And Test Power Output
Quick Summary
| Key Point | Explanation |
|---|---|
| 1. Conduct a thorough site assessment | Evaluate your property’s solar exposure and conditions to determine its suitability for solar panel installation. |
| 2. Choose an optimal mounting location | Ensure that the location receives at least 6 hours of direct sunlight daily and is structurally sound for installation. |
| 3. Securely install the mounting system | Follow guidelines to ensure the mounting system is stable, using appropriate hardware to prevent potential leaks and damage. |
| 4. Properly attach solar panels | Align and securely fasten each solar panel, making correct electrical connections to ensure efficiency and safety. |
| 5. Verify safety and test power output | Conduct safety checks and measure energy production to confirm the installation’s reliability and performance. |
Step 1: Assess Site and Gather Required Tools
Before installing solar panels, you need a comprehensive site assessment to determine your property’s solar potential and prepare the necessary equipment. This crucial first step will help you understand if your location can effectively generate solar energy and what tools you will need for a successful installation.
Start by evaluating your property’s solar exposure. According to TTV SUD, a proper site assessment involves measuring solar radiation and analyzing terrain usability. Look for areas with maximum sunlight and minimal shade from trees, buildings, or other obstructions. Ideally, you want a location that receives direct sunlight for most of the day.
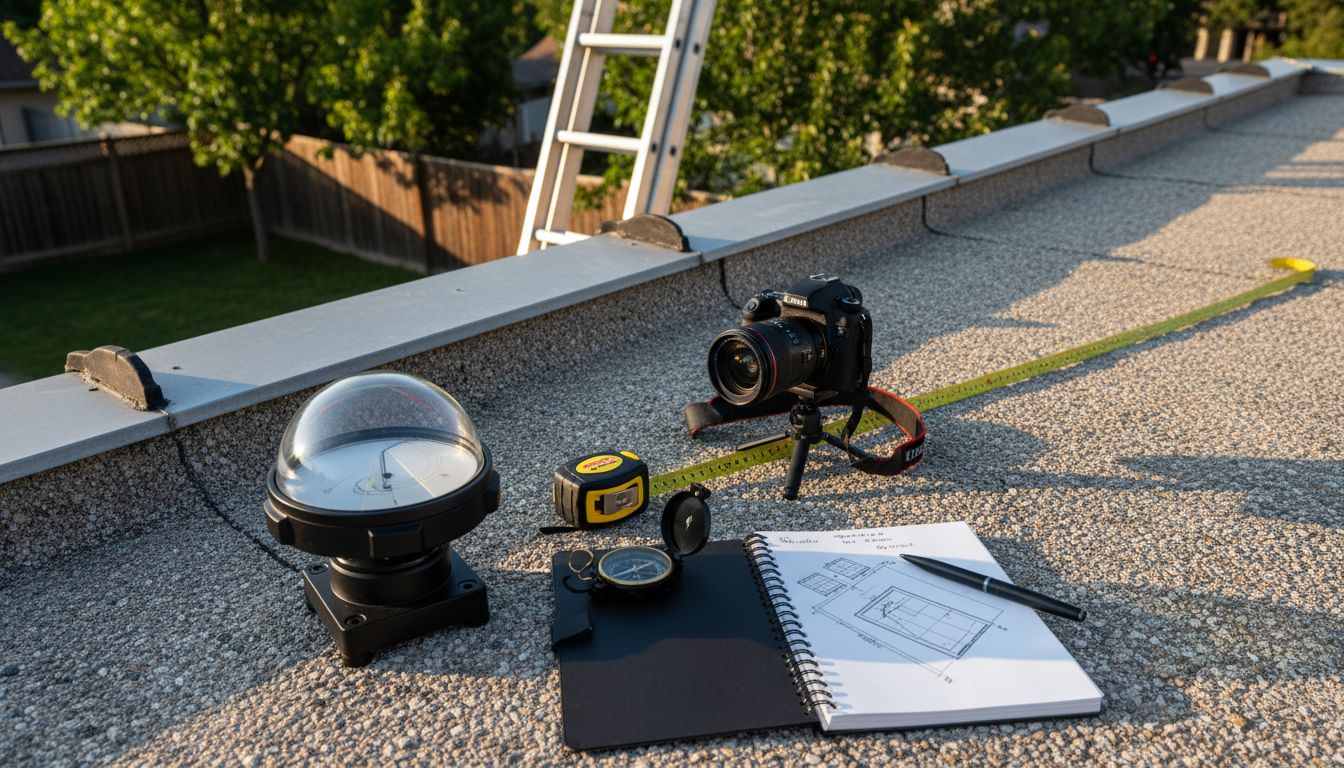
Gather the essential tools for your site assessment. You will need a solar pathfinder or solar site assessment tool, a digital camera, measuring tape, compass, ladder, and notebook. These tools will help you accurately document your site’s characteristics.
 Grow Solar recommends using specialized equipment to evaluate your solar window and potential energy efficiency.
Here’s a summary of essential tools needed for a site assessment:
| Tool | Primary Purpose | Notes |
|---|---|---|
| Solar pathfinder | Measure solar exposure | Specialized device |
| Digital camera | Document site features | Take photos of obstacles |
| Measuring tape | Measure area and distances | Accurate site dimensions |
| Compass | Determine facing and orientation | Helps with panel angle |
| Ladder | Access roof or tall structures | Safety precautions needed |
| Notebook | Record findings and notes | For planning reference |
Pro Tip: If you are not confident in performing a detailed site assessment, consider hiring a professional solar installer who can provide a comprehensive evaluation.
Once you complete your site assessment, you will have a clear understanding of your property’s solar potential and be ready to move forward with the next steps of your solar panel installation project.
Step 2: Select and Prepare Mounting Location
Choosing the right mounting location is critical for maximizing your solar panel system’s efficiency and longevity. This step involves carefully evaluating your roof or ground space to ensure optimal solar energy capture and safe installation.
According to the Solar Panel Installation Risk Assessment, selecting a mounting location requires thorough evaluation of structural integrity, access safety, and potential hazards. Inspect your roof or ground area for structural strength, checking for any signs of damage or weakness that could compromise the installation.
Consider the orientation and angle of your mounting location. While typical roof installations work well, ground mounting offers more flexibility for panel positioning. According to Wikipedia, solar trackers can help maximize energy production by orienting panels to minimize the angle between sunlight and photovoltaic surfaces. If possible, choose a location with southern exposure in the Northern Hemisphere to capture maximum sunlight throughout the day.
Pro Tip: Ensure your mounting location has at least 6 hours of direct sunlight daily and is free from persistent shade caused by trees, chimneys, or nearby buildings.
Measure and mark the exact mounting points carefully, ensuring you have sufficient space for the number of panels in your planned system. Clear the area of any debris or obstacles that might interfere with installation or panel performance.
With your mounting location selected and prepared, you are now ready to move forward to the next crucial step of your solar panel installation project.
Step 3: Install Mounting System Securely
Installing your solar panel mounting system requires precision and careful attention to structural integrity and safety. This critical step will determine the stability and long-term performance of your entire solar energy setup.
According to the Solar Panel Installation Risk Assessment, proper installation involves comprehensive evaluation of work at height and roof structure considerations. Begin by ensuring you have the appropriate mounting hardware for your specific roof type steel or aluminum mounting rails are typically most reliable.
Start with marking precise mounting points based on your previous site assessment. Use a stud finder to locate and mark roof rafters or structural supports where you will anchor the mounting system. Drill pilot holes carefully and apply waterproof sealant around each mounting point to prevent potential roof leaks. Secure mounting brackets using heavy-duty lag bolts that penetrate directly into roof structural members for maximum stability.
Pro Tip: Always use stainless steel or galvanized mounting hardware to prevent corrosion and ensure long term durability of your solar installation.
As recommended by Wikipedia, consider the potential for future solar tracking systems by installing mounting hardware that could accommodate such upgrades. Ensure your mounting rails are level and aligned precisely to maximize potential energy production and panel efficiency.
With your mounting system securely installed, you are now prepared to move forward to the next exciting phase of your solar panel installation journey.
Step 4: Attach Solar Panels and Make Electrical Connections
Attaching solar panels and making proper electrical connections is a crucial phase that determines the performance and safety of your entire solar energy system. This step requires precision technical skills and careful attention to detail.
According to the Solar Panel Installation Risk Assessment, installing solar panels involves complex considerations around electrical services and manual handling. Begin by carefully lifting and positioning each panel onto the mounting rails. Ensure you have a helper to support heavy panels and prevent potential accidents.
Carefully align each solar panel with the mounting brackets and secure them using the manufacturer recommended clamps or bolts. Make certain each panel is tightly fastened and level to prevent potential wind damage or performance issues. Connect the panels in series or parallel configuration depending on your system design voltage requirements. Use specialized solar panel connectors and ensure tight waterproof connections between panels.
Pro Tip: Always wear insulated gloves and use proper safety equipment when making electrical connections to prevent potential shock risks.
As recommended by Wikipedia’s Pvlib Python documentation, consider using simulation software to help model your system performance and verify electrical configurations before final installation. Double check all wiring connections and ensure they meet local electrical codes and regulations.
How to Set Up Solar Panels for Your Home: A Step-by-Step Guide can provide additional insights into complex electrical connection procedures. With your panels securely attached and electrically connected, you are now ready to move forward to the final stages of your solar installation project.
Step 5: Verify System Safety and Test Power Output
Verifying your solar panel system’s safety and testing its power output is the final critical step that ensures your installation functions efficiently and securely. This phase will help you confirm that all your hard work has resulted in a reliable renewable energy system.
According to the Solar Panel Installation Risk Assessment, comprehensive safety verification involves multiple systematic checks. Start by using a multimeter to test electrical connections and ensure no loose wiring or potential short circuits exist. Check that all grounding connections are secure and properly installed to protect against electrical hazards.
Next conduct a comprehensive power output test. Use your inverter’s monitoring system to measure initial energy production and compare it against your expected performance metrics. Wikipedia’s Pvlib Python documentation recommends utilizing simulation tools to help validate your system’s actual performance against predicted energy generation levels.
Pro Tip: Schedule a professional inspection to validate your system’s safety and performance particularly if you are not fully confident in your technical assessment skills.
Perform a visual inspection of all panel connections checking for any signs of potential wear damage or environmental stress.
Ensure all mounting hardware remains tight and panels are positioned exactly as initially installed.
What to Know About Solar Panels: Understanding Their Impact can provide additional insights into ongoing system maintenance. With your system verified and tested you are now ready to start enjoying clean renewable energy from your new solar installation.
Take Control of Your Solar Panel Installation Journey Today
Installing solar panels can feel overwhelming when considering detailed site assessments, mounting challenges, and ensuring electrical safety. You want clear guidance to navigate these technical steps with confidence and smooth execution. This guide highlights crucial stages like evaluating solar exposure, securing mounting systems, and verifying power output that every homeowner must master to enjoy reliable clean energy.
At HTEXS, we understand the importance of clear, honest insights to help you overcome these common hurdles. Dive deeper into solar technology and related innovations on our platform where you will find trusted reviews and practical tips to empower your solar project. Don’t wait to unlock the full potential of your property and protect your investment. Visit HTEXS now to explore how smart buying decisions and actionable guidance can make your solar installation safer and more efficient.
Frequently Asked Questions
How do I assess my property for solar panel suitability?
Begin by evaluating your property’s solar exposure. Look for areas that receive direct sunlight for the majority of the day, and assess for potential obstructions like trees or buildings.
What tools do I need for a proper solar site assessment?
Gather essential tools such as a solar pathfinder, measuring tape, compass, and a digital camera. These tools will help you document your site’s characteristics and measure solar exposure accurately.
How should I choose a mounting location for solar panels?
Select a mounting location that has at least 6 hours of direct sunlight daily, preferably with southern exposure. Ensure the area is structurally sound and clear of obstacles to allow optimal placement and performance of the panels.
What steps should I take to install the solar panel mounting system?
Start by marking precise mounting points based on structural supports. Use heavy-duty lag bolts for securing the mounting system, and always apply waterproof sealant around pilot holes to prevent leaks.
How can I ensure the electrical connections are safe when installing solar panels?
Verify all electrical connections by using a multimeter to check for any loose wiring or short circuits. Ensure all grounding connections are secure and tightly fastened to maintain safety and prevent electrical hazards.
What should I do after completing the installation to verify system performance?
Conduct a power output test using your inverter’s monitoring system to measure energy production. Perform visual inspections to check for wear or damage on all connections and ensure hardware remains tight.
Recommended
- How to Set Up Solar Panels for Your Home: A Step-by-Step Guide – htexs.com
- What to Know About Solar Panels: Understanding Their Impact – htexs.com
- 8 Essential Solar Technology Tips for Every User – htexs.com
- 7 Types of Solar Panels You Need to Know – htexs.com